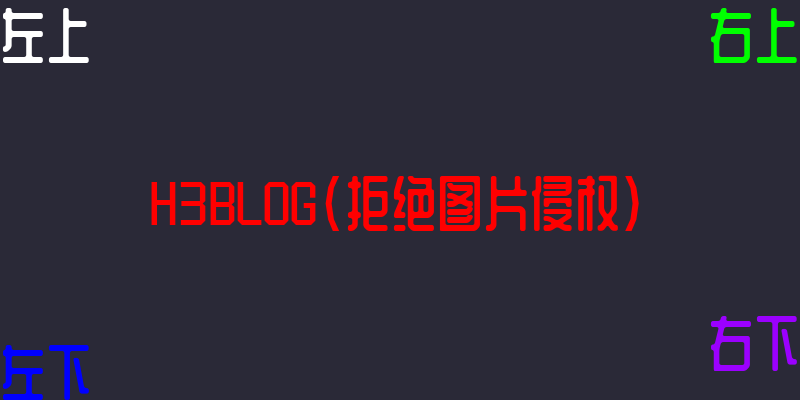
最近图片侵权事件很多啊,虽然何三笔记只是一个小小站,但也不想这种事件放生在自己的身上,于是抽空用python3开发了一个小工具,可根据配置文件生成想要的图片,这只是一个雏形,我的想法是把这个脚本融入到h3blog博客系统当中,真正意义上解决博客系统图源的问题。话不不说直接看代码。
源代码
class H3blogDrow:
    '''自定义图片样式'''
    def __init__(self) -> None:
        self.width = 800
        self.heigth = 400
        self.background_img = ''
        self.background_color = (42, 41, 55)
        self.layers = []
        self.convas = None

    def parse_config(self, config: Dict) -> None:
        c = config
        self.convas = None
        self.width = c.get('width', 800)
        self.heigth = c.get('height', 400)
        self.background_color = tuple([int(i) for i in c.get('background_color', '').split(',')])
        self.background_img = c.get('background_img', (42, 41, 55))

        layers = c.get('layers', None)
        if not layers:
            return
        self.layers.extend(layers)

    def _create_canvas(self) -> None:
        self.convas = Image.new('RGB', (self.width, self.heigth), self.background_color)


    def draw(self) -> Image:
        '''画图'''
        # 创建背景设置画布
        self._create_canvas()

        if self.background_img and len(self.background_img) > 0:
            regex = re.compile(
                r'^(?:http|ftp)s?://' # http:// or https://
                r'(?:(?:[A-Z0-9](?:[A-Z0-9-]{0,61}[A-Z0-9])?\.)+(?:[A-Z]{2,6}\.?|[A-Z0-9-]{2,}\.?)|' #domain...
                r'localhost|' #localhost...
                r'\d{1,3}\.\d{1,3}\.\d{1,3}\.\d{1,3})' # ...or ip
                r'(?::\d+)?' # optional port
                r'(?:/?|[/?]\S+)$', re.IGNORECASE)
            m = re.match(regex, self.background_img)
            bg_img = None
            if m :
                resp = requests.get(self.background_img)
                _img_bytes = BytesIO()
                _img_bytes.write(resp.content)
                bg_img = Image.open(_img_bytes)
            else:
                #创建背景图片
                bg_img = Image.open(self.background_img)
            #将背景图片写入画布
            self.convas.paste(bg_img, (0,0))

        for layer in self.layers:
            if layer.get('layer_type') == 'text':
                self._draw_text(layer)
            if layer.get('layer_type') == 'image':
                self._draw_image()

        return self.convas

    def _darw_image(self, layer: dict) -> None:
        pass

    def _draw_text(self, layer: dict) -> None:
        draw = ImageDraw.Draw(self.convas)
        _font = layer.get('font')
        font = ImageFont.truetype(_font.get('font'), _font.get('size', 36))
        align = layer.get('align')
        p = tuple()
        if align and align == 'center':
            f_w, f_h = font.getsize(layer.get('text')) #获取字体大小
            p = ((self.convas.width - f_w)/2, (self.convas.height - f_h)/2)
        elif align and align == 'top-left':
            p = (0,0)
        elif align and align == 'top-right':
            f_w, f_h = font.getsize(layer.get('text')) #获取字体大小
            p = (self.convas.width - f_w, 0)
        elif align and align == 'bottom-left':
            f_w, f_h = font.getsize(layer.get('text')) #获取字体大小
            p = (0, self.convas.height - f_h)
        elif align and align == 'bottom-right':
            f_w, f_h = font.getsize(layer.get('text')) #获取字体大小
            p = (self.convas.width - f_w, self.convas.height - f_w)
        else:
            p = tuple([int(i) for i in layer.get('position','0,0').split(',')])
        color = tuple([int(i) for i in layer.get('color','0,0,0').split(',')])
        draw.text(p, layer.get('text',''), fill = color, font = font)
配置文件
配置文件相对来说比较简单,定义画布,然后定义图层,程序是在画布的基础上逐层进行绘制就ok了
config = {
    'width': 800,
    'height': 400,
    'background_img': '',
    'background_color':'42,41,55',

    'layers': [
        {
            'layer_type': 'text',
            'color': '255,0,0',
            'font': {
                'font': './font/站酷庆科黄油体.ttf',
                'size': 60,
            },
            'position': '0,0',
            'align': 'center',
            'text': 'H3BLOG(拒绝图片侵权)'
        },
        {
            'layer_type': 'text',
            'color': '255,255,255',
            'font': {
                'font': './font/站酷庆科黄油体.ttf',
                'size': 60,
            },
            'position': '',
            'align': 'top-left',
            'text': '左上'
        },
        {
            'layer_type': 'text',
            'color': '0,255,0',
            'font': {
                'font': './font/站酷庆科黄油体.ttf',
                'size': 60,
            },
            'position': '',
            'align': 'top-right',
            'text': '右上'
        },
        {
            'layer_type': 'text',
            'color': '0,0,255',
            'font': {
                'font': './font/站酷庆科黄油体.ttf',
                'size': 60,
            },
            'position': '',
            'align': 'bottom-left',
            'text': '左下'
        },
        {
            'layer_type': 'text',
            'color': '155,0,255',
            'font': {
                'font': './font/站酷庆科黄油体.ttf',
                'size': 60,
            },
            'position': '',
            'align': 'bottom-right',
            'text': '右下'
        },
    ],
}
程序执行
d = H3blogDrow()
d.parse_config(config)
img = d.draw()
img.show()
最终结果


